Summary
This article shows you how to build (almost) free wicking beds out of scrap materials -- the sort that you might have lying around your backyard, or might find on the side of the road. Some of this post is repeated form previous posts, but it's designed to be a reference that contains everything about the building of the beds.Wicking beds need a water reservoir and a soil-water barrier. We've used builders' plastic and geotextile, which are the only things we've bought for the beds. This has saved us about $1000 in timber or corrogated iron raised beds.
Introduction
If you live in an arid climate, and want to grow (annual) vegetables, wicking beds are a great way to save water. The water "wicks" up, from below, through the soil -- the driest soil is right at the surface -- which minimises evaporative losses. It also encourages deep root growth which makes for stronger better plants.Gardening Australia has a great introduction to wicking beds, I won't duplicate its content.
As much as we love gardening, part of the reason we do it is to save money. When we harvest vegatables, it is great to think that they're "free". Of course, it is really easy to get carried away spending money in the garden -- so that home-grown vegetables become an expensive luxury instead of an economy. A big part of this is that we are so conditioned to view spending money as a way to solve problems. If you want to sort something out, just buy xyz which will do it. It is really hard to get away from that mindset to a mindset of trying to solve a problem with whatever is on hand, and make the best of things.
For this reason, the "normal" way to build raised garden beds these days is to build them with sleepers, with hardwood timber, using corrogated iron circles etc. We wanted to have a large area of raised (wicking) beds, and I worked out that if we followed this route it would have cost us about $1000 in materials. I wanted to explore whether it could be done more cheaply.
Partly, this is an exercise in simply saving money. Partly, it is trying to find ways to garden and live that are accessible to more people than slapping down large amounts of cold cash.
Construction
I'll show you two different beds that I built. They are built differently, but share some principles.- If you want the sides of your bed to be less strong, don't build them so tall. Soil, like water, is heavy and the pressure it exerts on the walls of its container is directly related to its height.
- Some materials are strong in compression but not tension (eg. concrete, which is hard to crush but easy to snap) and some are hard in tension but not compression (eg. corrogated iron which is hard to pull but easy to bend). Base your design on the materials you have.
- Don't try and make the bed too strong. Think about a kid's inflatable paddle pool -- that is the sort of pressure we're trying to contain. If a plastic inflatable pool can do it, why should we need railway sleepers?
Wicking bed 1
This is the simplest bed I built. Its structure is made solely of old corrugated iron. The bed is circular. Usually, a corrugated iron raised bed would look like this or this.Note that the corrugations are usually horizontal, and there's a single piece of iron going the whole way around. This is great, but it needs to be especially rolled like this at the factory and is hard to transport. This makes it fairly expensive. Is there a cheaper way?
Yes! Get some scrap corrugated iron (free) cut it into lengths so that the length is the height of the wall you want (this can be done with tin snips), then rivet the pieces together in a circle. The circle is not rigid (like the above example) but flimsy -- but it doesn't matter. Get it into a circle shape, and fill it so that the whole thing is in tension, and it is not flimsy any more. This is what I mean when I talk about working with materials -- the bed doesn't have to be rigid (strong in compression) it just needs to be strong in tension (hold in the soil).
The bed is then lined, in typical wicking bed fashion, and filled, etc.
The top edge of this will be sharp (it's the end of the iron, and may have been cut with snips) -- get a piece of old hose and slice it longways, then put it over the edge. To help it stay on, drill holes every 3rd corrugation, and put a cable-tie through the hold and around the hose.
This bed works well, and is suitable if you want a round bed.
 |
| The completed bed. Extremely productive! |
Wicking bed two
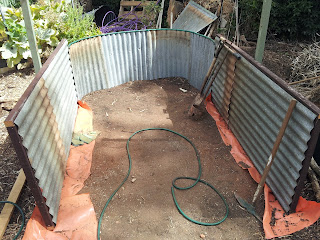
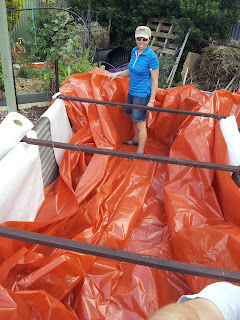
I wanted a larger bed, but didn't want just a larger diameter circle (2m diameter is about the maximum a person can reach into). A larger bed needs to be oblong, which requires a different design. I basically got the round bed (above), cut it in two, and put a square box in the middle. The ends of the bed work exactly as above, but the middle needs to be stronger. Having soil pressing against straight sides mean they need to be strong in compression as well as tension -- how to do this cheaply?I had some light meranti timber that my dad and I had salvaged. Its cross-section is only 35 * 50 mm (1.4 x 2") so it isn't very strong. I decided that if I can fix the ends of the "box" in place, then the box needs to bear smaller compressive forces. I did this by running timber across the top of the bed to stop the soil from pushing the sides of the bed out (you could also use rope or wire).
 |
| This bed is about 2 m wide by 4.5 m long |
Clearly, this only works at the top of the bed -- we still need to hold the lower corners of the box in place (where the pressure is higher, because there's more water/soil pushing down). This was done with a star-picket in each corner. I also sunk posts in the centre of each side into a hole in the ground with broken concrete rammed around. This all makes the box fairly rigid. Here are some under-construction photos:
 |
| The round end of the new bed. This will become more circular when it's under tension from the soil. Notice how simply it's joined onto the box, and the hose on top for safety. |
 |
| The inside of the partly built bed. The plastic here is to keep the meranti from the soil, which would cause it to rot. |
 |
| Then, cover the boxes with geotextile (weedmat). You want to stop the soil mixing with the water, but you want some of the soil to be in the water so that the water can wick upwards. |
 |
| The completed large bed -- planted out, seeds just germinating |
 |
| The completed large bed -- planted out, seeds just germinating |
Conclusion
We've now built three raised (wicking) beds: 7 square m, 3.2 square m and 9 square m. All we have bought is the builders plastic and geotextile. I think we've saved at least $1000.If anything in this post is unclear, or you feel that detail is lacking please let me know. I think these beds work really well, with the only cost being builders' plastic and some geotextile -- they really demonstrate that the raised-bed part of a wicking bed can be made for free.


